@erdoc48, I thought about that, but I decided that the whole thing was too foreign and unfamiliar to me, and I had already ordered a new oil pan. I was also worried about the possibility of metal shavings left in the oil pan, because the threads sheared off.
YouTube oil pans, it's really an easy job. Don't overthink it.
2000 Toyota MR2 Spyder, 2021 Lexus UX 250h F Sport
A is the rtv bead placement as you go around a screw hole and b is the rtv placement on a straight. Just one continuous bead. When i did mine, i just made circles around all the holes in case i messed up. You dont need that much rtv honestly. 4-5mm bead width
A is the rtv bead placement as you go around a screw hole and b is the rtv placement on a straight. Just one continuous bead. When i did mine, i just made circles around all the holes in case i messed up. You dont need that much rtv honestly. 4-5mm bead width
I also feel its important not to use too much. What ends up happening is the sealer gets crushed and then dips in the oil pan. After adding oil that flash might get detached and end up in your strainer and you end up having a thinner layer between the pan and the block. A nice bead in the middle of the mating surfaces with enough time to set up before tightening the bolts all the way keeps the sealant intact.
Ok, how are you guys separating the oil pan from the block? I know everyone says to use a paint scraper, but I feel like forcing an object into the seal really risks marring the mating surface of the engine block (obviously I don't care what happens to the old pan).
Tbh, i just yeeted it with a crowbar lol. I believe there are one or two spots where there is extra engine block not mating with the pan that you can lever off of. If i was really paranoid id get a stout plastic putty knife and hammer it in to break the seal in a few spots. It takes some force.
@ria thanks. I think maybe I'm being a little too paranoid. I see the special tool that Toyota recommends tapping in, so I guess that's not much different. The problem is my scraper is not L-shaped like that tool, so there is very little (often none) clearance for a rubber mallet. And all of the YouTube videos show guys doing it with the engine out of the car, upside down. Completely different from underneath the car, lol.
Also I've managed to make some progress with a razor blade - it's quite tedious, but there are a couple of spots where it's starting to wiggle.
I finally gave up at dinnertime last night. At one point I got a little to aggressive with a mini screwdriver and gouged part of the block. It's on the outer edge and not a mating surface, but still, I don't like prying at aluminum like this. I ordered a cheap copy of the special tool referenced in the BGB off of Amazon for $22, so we'll see how that goes. Generally I don't like buying cheap tools, but the real thing costs around $150, and high-quality copies half that (and neither would arrive until mid-July). It's basically just a wedge on an L-shaped handle, which should allow both clearance for a rubber mallet, and the ability to apply downward traction without prying.
A paint scraper that is thin enough will not damage anything. You need to work as many sides as you can weakening the bond then with the scraper you pry it off easily. No damage and it comes off easy. If you only pry one side and then use a screw driver to wedge it could potentially cause damage.
Pretty sure there's a couple of pry points around the perimeter, but a paint scraper works well too. I usually pry a few places then a few whacks with a deadblow knock them loose.
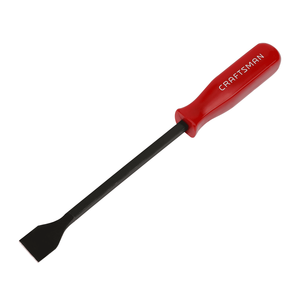
I've been really busy with work and family stuff over the holiday weekend, but I got back to working on the car today and finally got the oil pan off. What ultimately did it was this:
A gasket scraper. Sort of like a screwdriver, but the tip is beveled to a finer edge, and much wider than a screwdriver (1" in this case). I also removed the right rear wheel for better access, and that was where I ultimately broke the ban free. I did end up lightly scoring the block, which I was afraid of; hopefully I will still be able to get a good seal. I don't see how I could've possibly pried the oil pan off with any less force, though - the thing was nearly fused to the block.
Would anyone recommend any real fine sanding of the block? I'm worried about the scoring screwing up the seal, but I also don't want to make things any worse.
I wouldn’t sand it unless it’s a large gash. The gasket sealer should be strong enough and oil resistant enough to prevent leaks.
It's not a bad idea to get a putty knife made of plastic for this kind of job. Might end up getting mashed up but hey, how often do you do an oil pan?
Like Dev said, as long as it's not really deep, ignore it and trust the RTV.
2000 Toyota MR2 Spyder, 2021 Lexus UX 250h F Sport
@bimmer-bobI would prepare the surface by carefully removing any sealer residue with a single-edge razor blade and then cleaning with a solvent. Don't worry about knicks and scratches; the sealant does a great job filling scratches.

