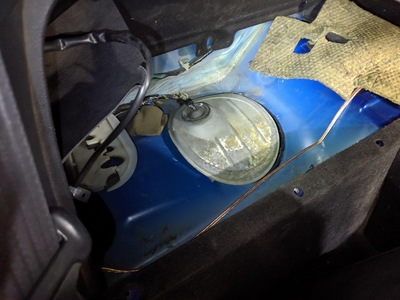
Hey guys. My fuel pump access cover was sealed with nothing but butyl but the stuff is old and worn out so while driving it slid itself off. Reseal is as simple as replacing the butyl correct?
Also that insulation piece with the two square holes. How is it supposed to lay down? I can't figure it out. All help appreciated!
2000 Toyota MR2 Spyder, 2021 Lexus UX 250h F Sport
I think that piece just sort of sits on top. it will be mostly held in place when everything else is there. the seal should be fine replacing that butyl.
Get your Short Antennas, Decals, and all sorts of goodies at:
https://takubanmotorsports.com
That cover is weird. I had the same questions. It has a slotted tab sticking out that looks like should bolt down. But no bolt. Just the black gooey stuff. Is it supposed to be a blow out door in case of rapid cabin decompression?
I make Amateur Armrests - see the Commercial Forum. I also have SMT repair seals available.
Haha thanks guys. I'll re-butyl it, luckily I have some. And throw that weird insulation I can't figure out on top.
PS: Dropping the tank is a pain.
2000 Toyota MR2 Spyder, 2021 Lexus UX 250h F Sport
...
PS: Dropping the tank is a pain.
Great. That's what I figured. But I need to replace my e-brake cables and I would like to install a hard dog at some point.
Get your Short Antennas, Decals, and all sorts of goodies at:
https://takubanmotorsports.com
It's not awful. By ANY means. Two people can do it. It's just annoying and fiddly. The fuel lines up top are a bit tough. The AC lines are in the way of the tank, and my full body brace was in the way of the AC lines. And I couldn't remove it, bolts are ruined. Once the fuel lines are out, the tank actually goes up and down fairly easy. I can provide some step by steps later if you'd like.
Also I resealed the cover. Used some fancy headlight butyl, Morimoto RetroRubber, which I had on hand. Molded it, heat gun, press down. Seems fairly sealed!
2000 Toyota MR2 Spyder, 2021 Lexus UX 250h F Sport
That sounds awesome. some sort of step by step would be helpful. I have a Corky's breasplate, but no other non-stock bracint in that area. I have TRD rear member braces, but I don't think they are in the way.
Get your Short Antennas, Decals, and all sorts of goodies at:
https://takubanmotorsports.com
I promised you a step by step, I will give it to you! Just a heads up, I used the Hard Dog install as a reference for a lot of the steps. https://www.spyderchat.com/threads/harddog-rollbar-installation-guide.34959/
Step 1: REMOVE THE BRACKETS NEAR THE PINCH WELDS! There is a bracket on each side held in by a 10mm near the rear jack point, it holds the AC bracket. Once the car is on jack stands it might be hard to reach. Sure was on quick jacks. So do this first, it's just two bolts you can feel out while the car is on the ground.
So next remove the interior panels covering everything. I'd HIGHLY recommend removing the seats, so much easier working in there. Center console can be removed any time, I used the cup holder for holding bolts. Remove the two metal covers over the fuel parts, driver's side just has 5 nuts and passenger side is glued in.
Remove the bracket on the fuel pump, two 8mm. Then you can unplug the two plugs. The big white one is a bit annoying. Removing the fuel and evap lines sucks. Use two tiny flat heads and stick em in the sides of the lines to lift the tabs, then pull out. Undo the ones listed in the above instructions. I undid too many.
Time to drop the fuel tank. Loosen a bunch of the brackets for the AC lines to give them some slack so you can move em around. You may need to loosen some of them in the center tunnel, I couldn't but it would help. Then remove the filler neck hose, just a clamp and some twisting. Fuel will come out, so grab a pan and tip the hose down to get a bunch out. Set some jack stands under the fuel tank, let it drop like 4-6". Undo the four bolts holding the fuel tank in, and lower it down either by hand or with a jack.
From there, remove that round black cover. It twists but it's very difficult. Pry on the white tab on the side to help. Then remove the line. And remove the thin line going wherever the hell it goes that's to the side of that cap. The photos in the instructions already show it removed, it's the thin nipple.
Get under the car and drop the tank all the way. From there, just undo the two or three brackets that hold in the parking brake cable, remove the end from the cabin, and remove the end from the caliper. Caliper side you remove that brake line clip, then pop the metal clip from the end, and pull the pin out. Install the two ends of the new cable as they were, then bolt in the brackets. The brackets move on the cable so you can adjust them a bit. Make sure the rubber grommet for the interior is seated well, silicone spray helps.
Lift the gas tank up, rest it on jack stands. Get all the lines routed and sitting pretty, install what was removed, install cap. Forgot the cap, had to drop the tank AGAIN to do this. Lift tank rest of the way, install four bolts. Reconnect all brackets below. Reconnect all lines above. Install interior.
Hope I didn't forget anything!
2000 Toyota MR2 Spyder, 2021 Lexus UX 250h F Sport
