Today Dev and I are getting ready to replace the flywheel on my Spyder. I go under the car and get ready to put a socket on the transmission drain bolt. At I am trying to get the socket fully seated, I hit the plug a glancing blow with the socket.
Damn! My old eyes must be failing me. It almost looked like the bolt twisted loose a little bit with just the slightest of taps. 🤔
Son of a bitch! The bolt is so loose that I take it the rest of the way out with my ....FINGERTIPS. WOW!
Putting the lube catch basin below the open drain I catch ..... less than 1/8 a pint of tranny lube. Boy-O-Boy! ☹️
Anyway, apparently the tranny drain plug vibrated free in less than 5K of miles.
So this got me thinking about the "Aging Spyder Checklist" I have been --- forever ---- thinking about but never got around to doing. I will start this list, but I really want lots of other members to add their input and two cents regarding what to look out for on our cars as they age.
#############################################################################
Every Fill Up:
Always, always check the Spyder's Oil level. Just In Case: carry a spare quart of engine oil in your car. Not every gas station will have the correct oil for our Spyders.
At Least Monthly:
Check each tire for proper inflation with a reliable tire gauge. At the same time, using the OEM "A 1 A" human eyeball look at each tire for unusual wear/checking/splitting or signs of any type of road hazard damage etc. (For extra security, also run your hand completely around the tire (particularly across both the inside and outside sidewalls. This will also alert you to potential foreign objects in the tire, belt shifting, delamination, etc.)
Every Time You Are Working Under The Car:
Verify with a wrench/socket that both the oil drain plug and the transmission drain plugs are firmly seated and locked. If either plug is leaking and/or loose, firmly seat each plug and torque to correct foot pounds. Then check whichever reservoir had leaking fluid for proper operating level(s). ASAP. If level(s) is/are low, top them off appropriately.
Fully investigate any new signs of fluid leakage and make whatever repairs are necessary. Upon completion of repairs, use brake cleaner, or another cleaning solvent to remove all traces of fluid leak(s). (In order to implement this important visual check, you must first remove any old oil, grease, and/or brake fluid spots.)
Within 50 miles of a seasonal tire change, rotation, or flat repair:
Check to make sure that the tire "Rotation" marks --- typically they have little arrows facing in the proper direction of wheel travel --- are facing the right way.
Check tire lugs with a toque wrench to ensure that the lug nuts are firmly attached/tightened.
Make sure tire air valves are properly covered.
At Every Season Change:
Check radiator for proper fill level and correct color of anti-freeze (verify: no oil; not rusty; anti-freeze installed, etc.)
Check windshield washer reservoir and fill with season-appropriate window washing fluid.
Run your fingers along the edge of your windshield wipers to verify that there are no cracks or chips and that the rubber is supple ...not brittle.
Inspect entire front windshield for small chips or cracks. (Many times these can be repaired by DIY methods if caught early enough and before the damage spreads too far.) Using windshield repair kits to fix any damaged areas. (BE VERY SURE to follow the repair kit directions exactly. Some kits need to cure in the sun. Some kits need to cure in the shade. Other kits have outside temperature requirements for proper usage.)
Check air pressure of spare tire in Frunk and top off as necessary.
Look carefully at each rotor to make sure that there are no grooves, chips, and/or excessive wear. (If you hear a high pitched squeal every time you brake, it may be time to change your brake pads.)
Inspect for paint chips, use touch up paint as appropriate
Check high light covers for hazing. If hazed, DIY polish them to remove haze. Can't remove the haze ... replace the entire headlight assembly .
DIY Fresh water high pressure wash car undercarriage.
Annually:
Check your manual transmission fluid level.
Before Taking Your Car To Be Serviced!
Always take comprehensive, dated pictures showing the entire interior and exterior of your vehicle. Places where you might want to do close ups are: car seats: odometer; doors; quarter panel; front and rear hood; engine compartment; under-panels along side of car prior to bringing the car in.
Always bring your wheel lock key --- regardless why your vehicle is getting serviced --- and hand it to the Service Manager before you leave. Also have the Service Manager write down that you have left the wheel lock key with them.
Never drop off your car after the dealer/service center is closed.
Always explain to the Service Manager, that Spyder's can ONLY be jacked at certain approved locations. If you are able, put this information in writing as well. Tell the Service Manager, if there ANY LIFT POINT QUESTIONS AT ALL to call you BEFORE they attempt to lift the car. Notify the Service Manager that, if the car is lifted correctly, the body of the car will be damaged and repairing the damage is likely to cost the dealer/service center more than they would ever guess!
Once your service/repairs have been completed and your car is brought out to you... do not get into your car! Instead, slowly walk around the outside of your car looking for any damage (don't forget the under-panels on the bottom sides of the car). Once you have completed the outside of the car inspection, do the same with the inside of the car. If there is any dirt, grime, rips, tears, body damage, etc. turn on your smart phone's tape recorder. Then record your discussion IMMEDIATELY with the Service Manager and have them, or you, write up what is newly wrong with your car. (If possible, have the Service Manager sign your copy as well).
Never drive your car and/or remove your car from the premises of a dealer or service center if they refuse to acknowledge and document damage to your vehicle. (If you want the Service Manager to take your body damage very, very seriously, call the cops and report that your car was damaged at the dealer/service center and ask them to file a report.)
Always pay for car repairs and/or service with a credit card; never with cash or a debit card.
Never pre-pay your repair bill before you inspect your car!
Never pick up your car after the dealer/service center is closed.
Let the list continue!
Oh no... I hope that plug wasnt loose for long... Hopefully you still have a transmission. One would think it would make some obvious audible complaints with that little oil to go around.
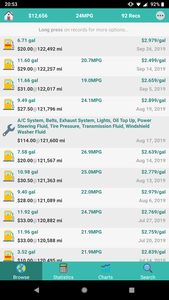
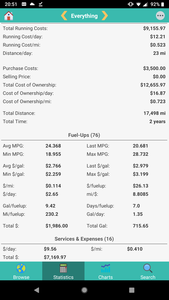
Nice checklist! I use an app called ACar for this. It tracks fuel economy, sends me reminders for whatever I choose, tracks expenses, parts, etc. You can set maintenance reminders to notify you based on mileage, or time, or both. It even provides nice stats and charts. The last couple of cars I've sold off went with a long printout from this app that provided info on every fill-up, every maintenance, etc.
Example:
Disclaimer: I'm not affiliated with ACar or Fuelly in any way... I'm just sharing my solution to the topic at hand.
This is not the first time I have seen bolts shake loose. I use to find some over the years due to vibration.
When the first few bolts started coming loose around the engine compartment I decided to do yearly inspections before my car is ready for the season.
The best way to take care of this problem is so have a bottle of blue Locktite and go over any bolt that you remove from a repair or any crucial bolts you feel could use the treatment. Blue Locktite will do two things.
1.It will dampen vibrations and grab the bolt from moving.
2. It will create a water resistant barrier that will prevent seizing of the bolts better than anti size which is counter intuitive.
You would never think bolts come loose and just the opposite because they generally get rusted but that is not always the case and it remains a big mystery.
Any time I'm under the car, I check suspension arm bolts and look for any leaks. I'm currently working on an excel spreadsheet that I plan on laminating so I can use a dry erase marker to use as a checklist for inspecting the car. When I finish it I'll post it up for others to use, critique and improve on.
Loctite all the things! Had a rear trailing arm fall out not long ago.
2000 Toyota MR2 Spyder, 2021 Lexus UX 250h F Sport
Wow! With all the things vibrating loose on our Spyders ..... and all the folks new implementing the "Blue Loctite Everything" solution; I am going to have to buy some Loctite stock ASAP!
Many of the suspension bolts and nuts have a locking devise on the nut and base of the arm. With that in mind the manual tells you when removing the bolt do not turn the nut, turn the bolt. Assembly would be the same. In this case if properly disassembled no locktite would be necessary.
My advice for the transmission drain and fill plugs is to use loctite PST (the white anaerobic thread sealant) on the plug threads. It helps seal and is very mild threadlocker
Dave
Further regarding the transmission drain plug, a 5/16 diameter rare earth magnet, like these fit right inside the hollow plug. Just don't ever expect to get it out again.
Here is the full name for Dave's Loctite:
Loctite PST Strength 565 Thread Sealant, 50ml. I found it on Amazon.
PWNZOR: My spreadsheet would look something like yours....however my mileage would be <8,000 and my repairs and upgrades would be >$8,000
Paul
Many of the suspension bolts and nuts have a locking devise on the nut and base of the arm. With that in mind the manual tells you when removing the bolt do not turn the nut, turn the bolt. Assembly would be the same. In this case if properly disassembled no locktite would be necessary.
Maybe I’m crazy but I usually put lithium grease on threads and rely on the torque specs to keep the bolts tight.
I make Amateur Armrests - see the Commercial Forum. I also have SMT repair seals available.
@cycleheadThe torque specs are only for dry and clean threads! When you use the published torque spec on a lubricated thread, you end up with a lot more tension in the bolt than it was designed for. This can be very dangerous on suspension components. Even Loctite functions as a thread lubricant. Please stop doing this because you could have a failure in a critical fastener. You seem to have been lucky so far.
Dave
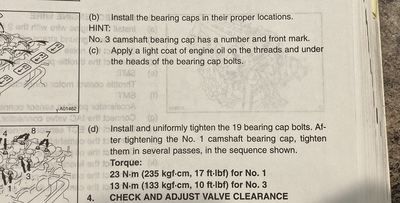
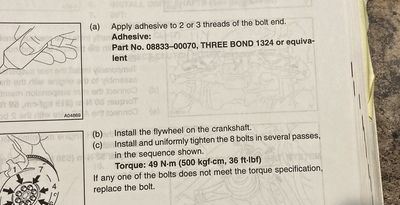
I believe you are right! BGB specifies “light coat of engine oil”, or “apply Three Bond adhesive to 2 or 3 threads”, but only on specific bolts. So folks putting loctite on everything should reduce the torque spec by 30%-40%. I note that the google caution about overtorque due to lubricated threads says “the bolt may break”. So I take some consolation that a bolt that breaks due to overload will likely happen during installation. I think the most dangerous installation is an undertorqued bolt which will experience cyclic loading, and will fail from fatigue.
I make Amateur Armrests - see the Commercial Forum. I also have SMT repair seals available.
@cyclehead The danger is that the bolt won't break (or strip) when torqued wet, but will yield and/or develop a small crack (after yielding) and then its fatigue strength (life) goes way down.


