MR2 Spyder: A Love/Hate Relationship, Chapter 3:
Engine & Transmission Swap:
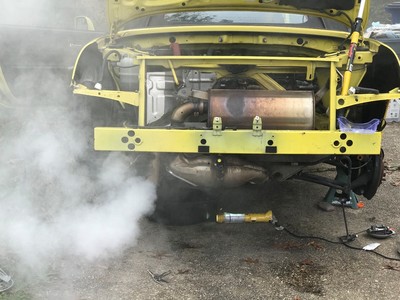
If you have been following this saga, you know that in Chapter 2, while attempting to remove the pre-cats from my Spyder (AKA “Itsy Bitsy”), I ended up irreparably damaging my 1zz engine instead.
Having read enough SC posts earlier, I had convinced myself that having my damaged motor rebuilt would be a very expensive exercise in futility. Simply put, it is more cost effective and reliable in the long run to put a newer 1ZZ motor back in.
A more expensive, more powerful solution would be to swap in a newer 2ZZ engine.
As much as I lust for more horsepower in whatever vehicle I drive, I decided to stick with another 1ZZ engine just because I wanted to experience how the Spyder accelerates and handles with the OEM motor. My decision to swap in a Euro style 6 speed manual transmission was driven by my hope to be able to take Itsy Bitsy on a long cross-country drive. I had multiple opportunities to make the “See America” road trip when in my late teens and early twenties. However, having to work in order earn money to go to college always stopped me from taking the journey.
ASIDE: Based upon the current resale value of 2ZZ equipped Spyders, it appears to me as if the significant additional costs of having a 2ZZ engine are rarely recouped when the car is sold.
So then began my search for an experienced, reputable, and affordable mechanic to do my engine and transmission swap. Given that my Spyder was only running on 3 cylinders after the failed pre-cat removal, plus I was burning a quart of oil every 45 minutes, my preference was to find a local (MD, VA, DC, PA) mechanic. However, each of the local mechanics I found failed to have one --- or more ---of the criteria I was looking for.
I had to expand my mechanic search beyond the local area. With longer travel times, I investigated: paying to have my car transported (too expensive, for me); and towing the Spyder behind my minivan. Unfortunately, as I was told by the car trailer rental agencies, my van did not meet their “minimum weight and/or horsepower” for use as a towing vehicle.
Bummer!
Reading SC posts regarding mechanic, one name popped up repeatedly: NoCoolName. I contacted NoCoolName (AKA Justin) and we had multiple on-line and telephonic conversations about how the swap could take place and an estimate on the labor costs involved.
The only sticking points were: that NoCoolName lives 12 hours away from my home in Silver Spring, MD; that my Spyder was running on only 3 cylinders; that the newer engine, transmission, exhaust system, new parts, and copious replacement fluids would all have to be transported to NoCoolName’s work shop.
For several days, I got price quotes for shipping and/or trucking all of the swap components to NoCoolName’s work shop and every solution was either unworkable or beyond my budget. It was very discouraging, to say the least.
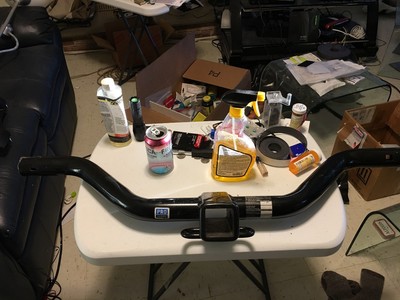
One night, as I lay sleeping, at about 3 a.m. I had an epiphany: other SC members had written about using the rear towing hitches on their Spyders to attach a modified towing hitch; some people mounted a storage rack, others claimed to be able to haul a small track tire filled trailer. Finally I had found my solution!
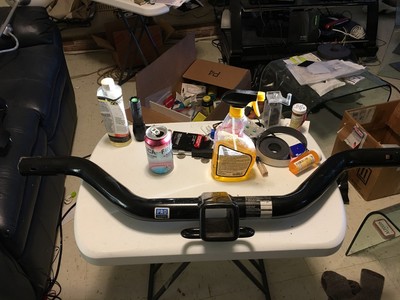
It took me 4-6 weeks to find a used trailer hitch for sale that had been modified to fit our Spyders. I bought it sight unseen.
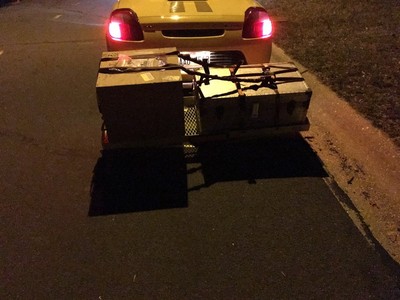
Once the trailer hitch was in hand, I then went shopping for a storage rack that would be big enough and heavy duty enough to handle everything I was going to have to bring to NoCoolName’s work shop. I ended up with a steel rack that was about 28” deep and 50” wide that slipped perfectly inside my Class III trailer hitch.
NoCoolName and my schedule dictated that we do the swap in March of last year. Arrangements were finalized, my GPS was programmed, and I started loading my Spyder for its long journey.
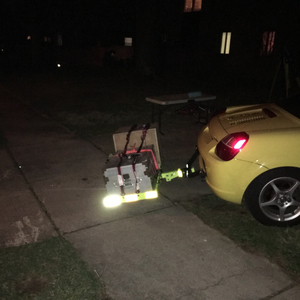
On the day before my trip began, I pulled the passenger’s seat out of my Spyder and used that space to load all the new parts, exhaust system, and copious replacement fluids, hoses, and belts. As close to my Spyder’s bumper as possible, I loaded the exterior storage rack with the crated engine, transmission, and my spare tire. (Months earlier I had removed my frunk plastics and storage bins to do some extensive electrical wiring for new gadgets). While the car settled noticeably down on its shocks everything looked iffy, but probably OK. It was now 11 p.m. on my scheduled day of departure.
Having the luck of the Irish (my last name is Corcoran), which is to say, no luck at all; I decided to take a 10-mile test drive to ensure that everything stayed put and no problems developed. My test trip was uneventful.
However, when I attempted to pull my Spyder up into my driveway, I heard a very loud scrapping sound. When I went to investigate, I found that the rear end of my storage rack was firmly on the cement apron of my driveway. Additionally, the rear end of my storage rack was at an approximately 40-degree angle pointing downward.
Further investigation verified that the two tack welds which hold each of the rear tow hooks had both broken free from the car’s frame.
Packing, Take Two
When you only have one option left, it certainly clears your mind of alternatives. Everything was going to have to go inside of the Spyder. I decided to go to bed and reload everything the next day.
Yep, you read that right. The crated engine went up into the footwell. The crated transmission went right next to it. The new replacement parts (gaskets, hoses, alternator, started), and copious replacement fluids were all put behind the drivers and --- missing--- passenger’s seat shelf. Overflow items were packed in between the motor and the transmission. A new exhaust system was the cherry on top of the cake.
Alas, there was no room for my spare tire/donut. Luckily, I had bought a used classic over the engine compartment luggage rack. I strapped the tire in with 2 very stout ratchet straps.
By the time everything was packed I had lost yet another driving day.
On day 3, I started my 12-hour trip by fighting 6 a.m./rush hour traffic on the Maryland Beltway and Interstate Route 70. If you have not driven a severely over-loaded Spyder running on 2- 3 cylinders, where you must stop every 45 minutes to add an additional quart of oil, you have missed a very exciting and harrowing experience!
It quickly became evident that, except when new traffic was entering on the right, I would spend the entire trip in the right lane and/or breakdown lane. My driving style was very simple, struggle very slowly up the hills, accelerate as much as possible down the hills. I never, ever, let myself get boxed in.
Every 45 minutes I had to pull to the side of the road in order to pour another quart of oil into the failing engine.
Two hours into my trip I had my first real excitement. As I was driving along, I heard this really strange loud warbling sound, followed by an even louder Twang! I pulled to the side of the road fully expecting to see smoke or fire coming out of the engine and possibly oil shooting all over.
Somehow, even with two tight ratchet straps, my spare tire had broken free from it's restraints and flown off the car. Trying to be an optimist, I pulled off on the next exit and went back around to see if my tire could be salvaged. Nope. A 16-wheeler (or thirteen) had hit the tire/rim repeatedly and the space saving spare now looked more like a taco that a tire.
Five hours into my trip I saw the sign that I had been dreading all along, “Steep Grade Ahead, Truckers Go To Far Right Lane, Vehicles Going less than 45 miles per hour must use flashers.” Given that this sign showed up right after I had gone over what appeared to me to be very steep hill indeed, I was only going about 45 miles an hour at that exact point in time.
Rather than completely embarrassing myself and just in case my car completely died going up this visually endless steep slope, I quickly pulled into the break down lane. 45 quickly became 25 miles an hour and third become second gear. As I started to stall out at 10 MPH, I quickly downshifted to first gear and struggled mightily to get up the hill. When my Spyder finally reached the top, I shut down my engine and waited 45 minutes for it to cool down… it also gave me time to add another quart of oil.
I finally made it to NoCoolName’s workshop with my Spyder mostly intact. I seriously considered getting out of my Spyder and kissing the ground in thanks, but I did not want to freak Justin completely out before I even had a chance to introduce myself.
The Swap Begins
ASIDE: Because of my being tired from the long, slow, stressful drive, still suffering from a long-term illness, and not wanting to get in the way as the Swap progressed, I only took a few pictures. My apologies and nobody to blame but myself.
Within minutes, Justin and I began removing all the swap parts out of my Spyder. Moving efficiently and methodically, Justin (I am not quite sure how to honestly characterize the “Assistance or Help” I provided during the swap. Let’s just say I did what I could and stayed out of the way when I didn’t know what to do.) proceeded to begin to remove the engine components necessary to actually complete the engine and transmission swap.
After a couple of hours of non-stop work, a friend of Justin’s who is also an SC member, Drummerdawg, arrived eating (if memory serves me well) take out fried chicken. From that point on and through much of the following couple of days, Drummerwag and Justin did all the heavy lifting to complete the swap. I was regulated to asking a million questions about Spyders in general and Spyder engines, transmissions, and running gear specifically. Additionally, I removed any necessary engine and transmission parts so that they could be re-used with the newer engine and transmission.
While I was unable to do a Star Trek inspired complete “Mind Meld” with either Drummerdawg or Justin, nevertheless, I learned a life times worth of valuable information regarding our beloved Spyders from both of them.
Work continued unabated until everything that had to be removed to start the swap was completed. I would guess that we finished between one and two a.m. on day one.
Justin graciously allowed me to stay overnight with he and his family. Having been driving more than 12 hours straight and then assisting on my Spyder for 7 or more hours after that, I was completely trashed, and proceeded to sleep nearly 11 hours straight.
I shared late breakfast biscuits and coffee with Justin and his family (who were quite welcoming). Immediately after, Justin and I had a gourmet pizza for lunch. (It is never too early to start carbo loading in anticipation of a busy work day!)
Work began anew with Justin, Drummerdawg, and I around 1 p.m. The new 1ZZ engine, new clutch, lightweight flywheel, and pressure plate went in without any hang ups. While installing the new Euro 6 speed manual transmission, all three of us noticed that the rear axle control arms on the passenger’s side were both severely bent. Luckily Justin had used replacement arms, and these were switched out as well. (Why the expensive "Custom" alignment shop --- which did a complete 4 wheel alignment on Itsy-Bitsy only several weeks before --- failed to notice and/or mention the damage, really frosted my jaws!)
Close to buttoning everything up, Justing and Drummerdawg installed my new (much lighter, much less restrictive, and more sporty sounding) exhaust system.
The last item on our work list was to remove the factory oil pan and install a new high capacity --- 6 quart ---pPan3 aftermarket oil pan. When we removed the new oil pan from its shipping box we were shocked to discover that the turbo oil return bung (which I had paid $45 additional to have the manufacturer install) did not come with a pre-installed plug. Do to the fact that the turbo oil return bung took a hard to impossible to find plug; we were unable to install the new oil pan.
This was the only glitch we encountered throughout the entire swap process. In my book, that is a freakin miracle! The project was completed on time, within budget, with no injuries, and no screaming, yelling, or profanities. All in all we all enjoyed swapping tall tales, I learned better ways of doing things, and we all laughed or joked pretty much throughout the entire process.
If any SC members need to get any mechanical (and possibly, electrical, for all I know) work done I heartily recommend NoCoolName (AKA Justin) without any reservation. He is a class act and a wonderful person! I sincerely enjoyed meeting both NoCoolName and Drummerdawg.
Drummerdawg, I cant thank you enough for all of your knowledge, assistance, and levity! It is a pity --- or my near total deafness --- that I never learned your real name.
My drive back to Maryland was almost entirely in the dark and without any difficulties what so all. Once it got to about midnight and until dawn the day eafter, the highways cleared of much of their traffic. Putting the new Euro 6 speed manual transmission into 6th gear, I was able to cruise comfortably at 3,500 RPS doing 85 MPH.
BTW, the oil level on my new engine did not change at all during the 12 hour trip.
Within a couple of hours of my home, I encountered extensive sleet and snow on the highway. Dropping down to 60 MPH or lower, the Blizzack tires on the four corners of my Spyder performed perfectly under somewhat challenging conditions.
To Be Continued…
MR2 Spyder: A Love/Hate Relationship, Chapter 2:
Removing Itsy-Bitsy's Pre-Cats
So, for three days following my purchase of “Itsy Bitsy” and having brought her to my home in Silver Spring, Maryland, I kept the top down and just enjoyed driving my new convertible.
However, on the night of my third day of driving “Itsy Bitsy” I had a nightmare. In my dream, I was driving my Spyder when suddenly the engine exploded into flames and conked out. Then I flash forwarded to being in a car repair facility where the mechanic who had just disassembled my engine to find out what had gone wrong, was speaking to me. “Sorry to tell you, but your engine got destroyed by failed pre-cats. If only you had removed the pre-cats, you would still be happily driving your car far into the future.”
With that premonition firmly in mind, I decided to remove my Spyder’s pre-cats as quickly as possible. First, I read the numerous postings on SpyderChat to make sure I was doing the removal quickly, thoroughly, and with the least amount of work possible. I remember being surprised by numerous accounts of the pre-cat removal process being very difficult. But I was confident that with my 40 years of “Shade Tree Mechanic” experience I would be able to complete the job rapidly. I also failed to take in consideration that over 160K miles of engine usage might make everything harder to take apart. Little did I know!
Having already ground off the top of several nuts holding the heat shields during my aborted “Pre-Purchase Inspection,” I resolved that I would make every attempt to remove the rest of the bolts intact for all of the rest of them. The adage, “You can always tell a craftsman, by the quality of their work;” kept going through my mind.
I began the process by simultaneously spraying bolt loosener while I tapped each bolt and/or nut with a small ballpeen hammer. In the past, this method had always worked well with me. I then let the bolt loosener work its magic over the next 24/48 hours.
During the interim, I proceeded to removing all of the removable plastic panels and carpet from the interior of my Spyder. My plan was to carefully wash, clean, and surface coat all of the plastics; as for the carpeting, that was to be replaced.
Days later, I began to remove all of the pre-cat bolts and nuts. One of the first intact heat shield bolts refused to move even with my 24” breaker bar…so off to Harbor Freight (driving my Spyder) I went to buy a 36” breaker bar.
Even with the 36” breaker bar, the bolt refused to move. So I tried hitting the end of the breaker bar with a 5# sledge. At first, the sledge seemed to be doing the job, and I was happy to have found such an easy solution. It was only after I realized that all I was accomplishing was rounding off the bolt head, that I got a glimmer of how hard this project would actually be.
Once I got the O2 sensor heat shields and sensors removed, I used a small dental mirror to visualize the condition of the 2 pre-cat matrices. Luckily for me, both pre-cats were intact, so I re-installed the O2 sensors. Around this time my DD ---Daily Driver car--- crapped out, so I had to keep using my Spyder to get new tools, supplies, and parts.
All in all it was a hot, sweaty, knuckle bleeding, multiple month process. If I had it to again, I would probably remove as many of the bolt heads and nuts as possible with an electric angle grinder and just go from there.
During the ensuing 35 to 40 hours I worked on getting the pre-cats off, I ended up making multiple trips to: Harbor Freight; Sears; automotive tool suppliers; as well as several purchases from Amazon. Here are the things I bought and/or tried: plumber’s wrench/pipe wrench; channel lock plyers; 3’ aluminum “Cheater Bar;” freezing ---I tried a canned spray along with a 5# purchase of dry ice accompanied by isopropyl alcohol; heating ---went through 2 cannisters of propane; first set of rounded off head sockets ----about $75; second set of rounded off head sockets ----about $50; multiple sizes of vice grips ---$45; metal drill bits ----$65; two sets of “EZ Outs” ---$50; Dremel tool cut off wheels ---$20; electric grinder abrasive wheels ---$15; plus two additional different bolt loosener spray products ---$16. To no avail, I also tried tightening bolts and nuts in an effort to loosen them.
During my next to last drive to pick up additional supplies, I was shocked to find that my Spyder’s motor ----which had run perfectly before I started the pre-cat removal process--- was now: smoking; idling poorly; and losing power. Major Bummer!!!!!!
So, for the next 6 months or so, I, along with multiple helpful SpyderChat members (Thanks CarlBecker, Dev, and other SC Forum members) attempted (unsuccessfully) to figure out what went wrong ----pre-cat matrices had failed during my attempt to remove them--- and, naively, I hopefully attempted to repair it.
Ultimately, when all diagnostic and moderately easy repair attempts failed; I decided to be ready for any eventuality by buying a very lightly full block 1ZZ motor from, yet another, SpyderChat member. From then on, I started carrying a 5 quart bottle of oil, rubber disposable gloves, plus funnel, for daily oil level checks and replenishments.
Due to sister in hospital slowly dying from caner, ongoing health issues, inclement weather, and other difficulties, I was unable to fix my DD. So, even though I knew the original engine in my Spyder had failed, it became my designated DD.
Determined to continue “Itsy Bitsy’s” restoration, I began to buy and stockpile parts and accessories in anticipation of installing the New-To-Me 1ZZ engine (Thanks dbloti) . So, here is what I got:
New BlueDriver OBDC reader/reset hardware and software
New front windshield and wipers (installed)
New front windshield tint film kit (to reduce glare from very top of windshield)
New emergency brake cable (installed)
New car battery
New Advanti ST 1 Storm Lightweight Wheels/Rims, 6 (Goodwin Racing)
New carbon fiber low clearance radio antenna
New sun visor removed plugs (Thanks fellow SC member)
New O2 Sensors
New intake manifold sensor (MAF)
New valve cover seal
New PVC valve
New LED bulbs almost everywhere
New front and rear cameras with recorder
New clear map lens cover ---Mitsubishi
Newly recovered leather heated seats (Thanks MikeV)
Used low mileage 6 speed Euro MT (Thanks MikeV)
New Whiteline rear brace (Thanks MikeV)
Nearly new coil packs, 4 (Thanks, fellow SC member)
MWR Short Shifter Kit & Brass Bushings
Used Che exhaust header (Thanks fellow SC member)
New (2) transmission shift cables
New and used motor mounts (Thanks CarlBecker and Dev)
New Denon Starter
New Denon Alternator
New 2ZZ clutch and throw out bearing
New interior carpeting
New rubber and stainless steel brake lines
Lightly used Blizzack winter tires
Lightly used Fidenza lightweight flywheel (Thanks fellow SC member)
New APR flywheel bolts
GPan 3, 6 quart extended aluminum oil pan
New drive belt tensioner & Belt
Used larger injectors ---for MAF mode--- (Thanks fellow SC member)
MAF mod spacer (Thanks Corky)
Full Body Stiffening Kit/Che Braces (Thanks former SC member)
Lightly used OEM shocks (Thanks former SC member)
New shock mounts and shock bellows
Cyclehead convex mirrors
New Spyder custom oil filler/funnel (Thanks Dev)
New KTS exhaust system
New instrument panel lens cover
New secondary power distribution panel and wiring
New front control arms ---Moog---
Used rear control arms (Thanks nocoolname)
Used Classic Luggage Rack (Thanks fellow SC member)
New OEM or better liquids: transmission oil; cooling system; brakes; and steering
Used: 2 ton foldable engine hoist; 2 ton load leveler; and rolling motor mount
To Be Continued
Duplicate post, please delete!
